


Our 'New' RV Bathroom door is now Well Hung!
If your RV bathroom door is one of the sliding (sort of), pain in your sitting parts, doors, I know just how much it irritates you. I got weary of the sliding mechanism hanging up, the door coming out of the track, and having to fight the snap used to secure it open or closed. I decided to get rid of the darn thing! It wasn't very hard to do.


The RV bathroom door installed when Jayco built our fifth wheel was a pocket door. Only problem was, they forgot the pocket! The door rolled on a track hung on the outside of the bathroom wall. In addition to functioning poorly, without being inside a 'pocket', nothing could be put on that wall. It had to be left clear for the door to open. More wasted space in an RV, where space is always at a premium.

When we were in camp, if we'd set a trash can or something else in the corner, against the wall, we'd have to move it all the time to get the RV bathroom door open. The latch was only a 'snap-on-a-strap' and the rolling track was less than prime and worked poorly. I finally had enough of it, and tore out that RV bathroom door wanna-be.


Re-working that, no pocket, pocket door not only gave us an easier to use door, it opened up a two foot wall that can be used for... whatever!? It had previously been blocked by the sliding RV bathroom door.
The job wasn't particularly difficult. A couple of things had to be dealt with. First, I needed to mount the hinges on the RV Bathroom door. So I had to mortise them in. Since the door is pretty thin, and the hinges to fit the door, are pretty light, I chose to use four hinges rather than the usual three, for strength.


The need to save weight while conserving precious space, in RV construction, means that walls, especially interior divider walls, are awfully thin.
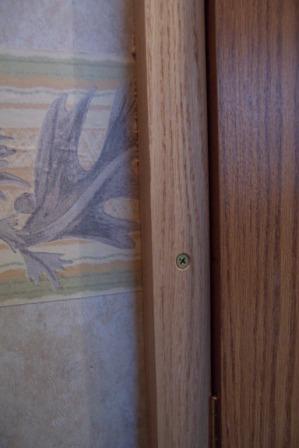
Installing an oak 1X2 stip re-enforced the doorway in the thin bathroom wall. It had been OK for the sliding door, with it's track hung from a frame member attached to the ceiling. But with the same RV bathroom door, now hung by hinges from the wall framework, that thin wall lacked the strength to hold up long, rattling down the road. That re-enforcing strip was just the ticket. Not much weight but it added a lot of rigidity and strength to the wall framework and provided a solid member for mounting the hinges.
Kind of hard to get a full length pic... the bathroom is a little cozy... but you can get the idea. This Oak hinge strip is on the inside of the bathroom wall, just a touch back from the door opening.
With the RV bathroom door rehung, I'm all done right?


Wrong!
I ran into ju-u-u-u-st a little bit of a problem. My intention had been to utilize a pair of magnetic, cabinet latches to hold the door closed. They would've worked too. If the wall on the latch side of the door way had been square. In doing this little modification, that wall was discovered to be around a half an inch out of plumb.
Basically, instead of cutting the door down to fit inside the smaller opening, (it was built larger than the opening to cover the hole, as a sliding door) I chose to hinge the door from a jamb affixed to the inside of the bathroom wall. It would close against the end of the wall running perpendicular to and ending at the bathroom.
That wall was to be the 'door jamb'.
The door didn't close squarely against the jamb. It hits the jamb at the top but is nearly a 1/2 inch away at the bottom. There is enough flex in the door you can easily push it tight, but the magnetic catches don't have the power to hold that!
Now, don't get me wrong, I like our rig. I really do. I'd use that other L word but I'm not feeling that mushy about things just now! :-) My affection for this rig doesn't change the fact that there has been a thing or two that needed correcting!
I had two choices. One would be to rebuild that end-wall section to square it up .... um .... NOT going to happen! That much rebuilding, to fix a minor flaw. didn't add up for me. (remember.... the old geezer is lazy!) The second option, and more appealing to me, was to find a convenient, mechanical, latch that would work.
Work in this case means, hooking the latch will suck the door in tight....
So, what kind of a door latch? The door is too thin, only about an inch and a quarter, for a standard bath door knob. They need an inch and a half. But, I still need to be able to latch it from either side. I needed a door latch on the inside for when you are using the facilities. Some folks, I understand, prefer a little privacy when they are enjoying break on the throne! Another was needed on the outside, to keep the door from floppin' around when we're going down the road.
In the aisle of a hardware store I found it. A simple, U shaped latch, originally designed to be a safety ~ security device. It had the attributes I needed for this project. I wanted a piece that was simple and quick to operate and had a low profile. Snagging on a darn latch, every time you went past the door was not going to be much of an improvement!

The only other thing I needed to do, to complete the RV bathroom door remodel was to trim out the door way with some oak pieces to give it a finished appearance. The opening had previously been cased with some plastic moulding. OK, but it never thrilled me a lot and it interfered with the door. (actually an oops. ... I hung the hinges a mite too tight, and the door was pushing up against that plastic moulding before it could close.)


Well, it's done, and it works! No more struggling, with that dang strap to open or close it. No more fighting with that poorly functioning RV bathroom door track. With the door on hinges, We've also gained some new wall space for hanging travel momentos, or maybe a bookshelf. Maybe, a combination of both?
There will be one small thing to do, sometime when I'm feeling ambitious. The door sits a mite higher off the floor than before, so the bottom gap is a little wide. I'll need to invent some sort of a 'skirt' for it to close that space up a little... Maybe a tooled leather apron across the bottom... How cool would that be?!
Return from RV Bathroom door to Goin' RV Boondocking

