Our RV Flooring Replacement
With Allure Vinyl Tile
Makes a HUGE Difference in Our Rig
It's a piece of work... but an RV Flooring Replacement is gonna make your life a whole lot easier!
Once you find out how much dirt you've been hauling around... and how much easier "cleaning house" is gonna be with a hard floor... you'll do as we did...
... and rip out all that nasty RV Carpeting so you can put in an ALLURE Vinyl Floor by Traffic Master!
Think 'bout this for a minute... You're RV Boondockng, out in the woods... surrounded by millions of acres of... WOODS! ... and it seems like an acre comes along with you every time you step inside!
You can vacuum and clean twice a day, and run a carpet cleaner over that floor every time you get home again...
...
and you know what you're still gonna find, under that carpet, when you
finally rip it out? ... dirt... huge amounts of cruddy, silty... Dirt!
Those cleaners simply can't get down to it...
Folks... carpet just wasn't made for the woods...or the desert... and I'm not even sure if it makes any sense in a regular house!... and if you've got dogs... or kids along... you just kick the the dirt collection into overdrive!
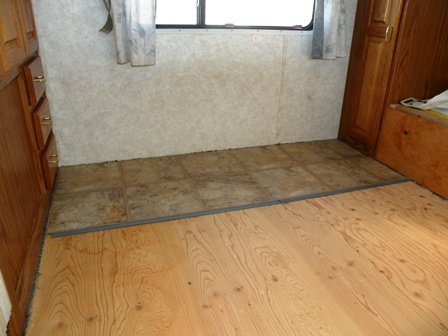
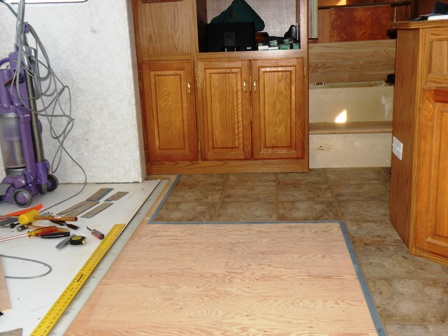
Now, I'm not gonna tell you that RV Flooring Replacement is an easy job... you do have to rip out all that old carpet... though in a lot of cases, you can leave any old vinyl in place...
In our case, the vinyl installed at the factory was poorly done, so I chose to rip it all out for our RV Flooring Replacement... In your own rig, that choice is up to you.
After doing a lil' research on our RV Flooring options, I went with vinyl floating flooring, and specifically, ALLURE Vinyl Flooring by Traffic Master, available at Home Depot. The reason is that it's virtually impervious to damage from getting wet... something the Laminate wood flooring cannot claim.
You get that stuff wet... often enough... and you're gonna be doing another RV Flooring Replacement a mite sooner than you'd planned on!
So... you think you want to do the work yourself... be a Frugal RVer... and maybe save some money?
Can You Do It? Can...YOU... do an RV flooring replacement?
You Bet! ... but, you say... "I'm not as young as I used to be... maybe I'm not up to it!"
Well, that's a judgment you'll have to make... Let me just tell you... I've been walkin' around with a busted up spine for nigh on to thirty years... a memento from the U.S. Army that got me mustered out... and I still got it done... so don't be put off by the athletics of it...
... I suppose some might have got this job done quicker than me... I take a few breaks now an' again to stretch my achin' Ol' back... but call it... a long day, or a day and a half... if you put it all together... probably some considerable less if you have some help... Me... I tend to work on such things alone... :-)
Just to juice things up... I started this RV Remodel while our sticks and bricks home was up for sale. I didn't think it'd be much of an issue... since the dang thing had been on the market for nearly three years...
But... Murphy's law bein' what it is... as soon as I got the whole trailer tore apart... you guessed it... We got a contract on the house... so the 'Urgency' to get finished got kicked up juuuuust a lil' bit! :-)
For Day 1 of the RV Flooring Replacement installation... I started layin' the new, Allure Vinyl Flooring up in the RV Bedroom area.
That's a nice, pretty square area, so not a terrible lot of cutting to install vinyl tile. Mostly just cutting lengths to fit... and only one "Rip"... when I got across the floor to fit the last piece in against the wall.
Down on the main floor I had to decide where to start... You can only do, the best you can do, here... Try and visualize how things are gonna lay... and which joint type you'll be left with... adhesive pointing up... or adhesive pointing down...
... and how that last piece will go together.
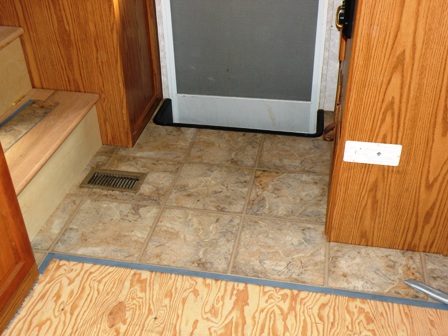
I decided to start laying floor at the front end... at the entry well.
I found I could cut narrow strips out of some of the waste from the bedroom floor... to fit in along side the factory entry step well... leaving the adhesive strips in place to secure to the next section.
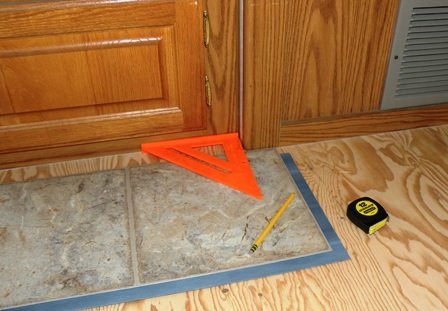
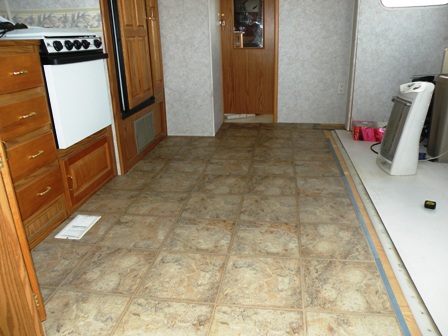
Then came, likely the most difficult part of the whole RV flooring replacement. The kitchen counter comes out in an L at that end. The section in front of the sink lays at about a 45 degree angle... and the tile had to be cut in around that as it came out and around from the doorway.
Once I made it around that section and down the front of the counter/cabinets the floor started going pretty quickly. Lots of measuring and marking... and rechecking to avoid any serious "Brians" ... but otherwise not a real tough deal.
One lil' slow down, doing the RV flooring replacement is when you come to cutting in the Floor vents. In our rig, there's an opening for a floor vent that sits in the kitchen area...
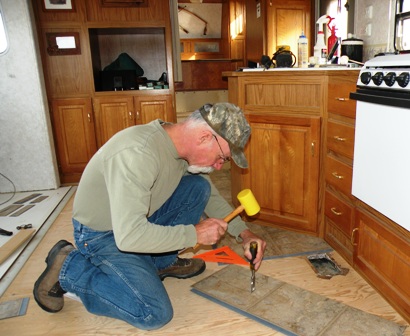
I tried cutting all the way through with a utility knife... but this Allure Flooring is pretty tough! For all those length and rip cuts, you only have to score it, then snap it over, and then make a 'separating' cut of the thin backing membrane.
I tried gingerly using a chisel on a piece of scrap wood to punch clean through... worked pretty good... right up until I was going across the end... where the opening came only about a 1/2 inch from the end of the tile... I guess I wasn't "gingerly" enough... and it cracked.
That lil' part is under the flange of the Vent Grill though... and right on the adhesive stip... so I'm not very concernedabout it... just don't tell my Ol' Gran'daddy... he'll come out of the grave and whup me with a stick! :-)
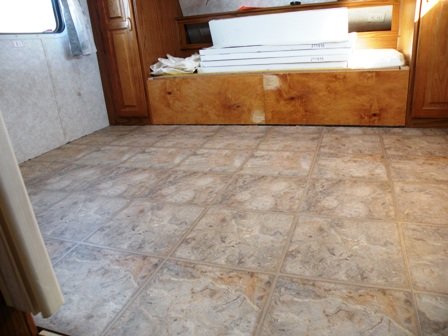
Once I made enough progress in my RV Flooring Replacement, to get back to a "straight line" of Allure Floating Tile, I could start moving pretty quickly. With no cutting, no notching, I could just pick a piece out of the box and taking care to get it aligned proper, lay it in place and walk it down.
Now... they'll sell you a roller to do that job. Seems to me just slowly bumpin' down the seam on the balls of your feet puts a pretty good pressure on that seam, and sticks it together just fine... without the expense of a roller.
Any place you can find to save a nickle or two, as you do your RV flooring replacement... is a nickle or two you can splurge somewhere else! :o)
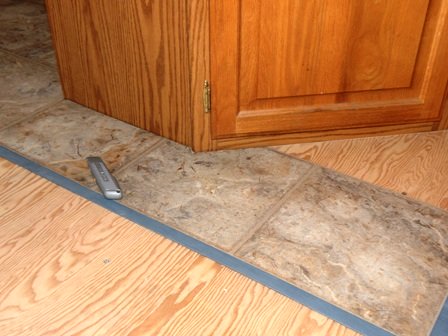
Lookin' good! You can see in this
next picture the narrow strip that runs down in front of the "Bearing
Bar" for the slide.While you need to leave a narrow expansion gap around
the tile... I wanted a tighter fit than what you see here.
As I was making any cuts I was careful to keep all those cut-off bits protected, using the paper that separates the tile in the factory box... I had a feeling they'd come in handy... I even kept several of the Long thin pieces where I had to clip off the 'down facing' adhesive (has the tile pattern on top!)... as well as any significant smaller pieces... you never know... and there will be plenty of time to throw out all the leavings, when the job is done!
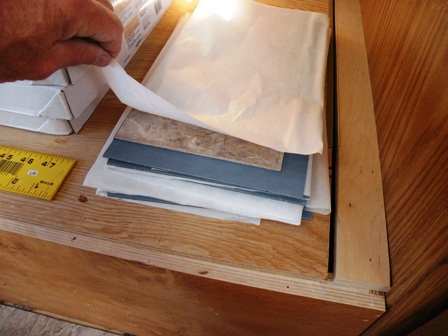
And a lot of those cutoffs did find use when doing an RV flooring replacement... Some of the cut-off rips from up in the bedroom and the other side of the main floor were just perfect for filling this gap and a few other lil' spots here and there... so... as you're making any cuts... think 'em out and leave yourself as much good "Filler" pieces as you can...
In the end... I was pretty happy how little waste I had from this RV Flooring Replacement... considering this stuff cost something around $2.63 a square foot... Now, that might not sound like much to you... but this Ol' Cowboy is so tight youcan hear him squeak when he walks!
With the fixed floor laid in, the RV Flooring Replacement moved into the Slide. Several pieces of "scrap cutoffs" I'd carefullysaved fit perfectly across the outside wall creating a perfect lay for the remaining floor, across the slide, without any cutting required! Sweet.
The lines of the tile in the Slide don't match up with the pattern on the fixed floor but you know what?... It's a long way from my heart... and I just couldn't see the sense in doing all the heartburn required to get that match... rather than the way I did it... Maybe you'll be more finicky than me... I don't expect to be pondering on it much... or even at all! :-)
anyhoo... The Slide floor is now all laid in... and only trimming it out remains...
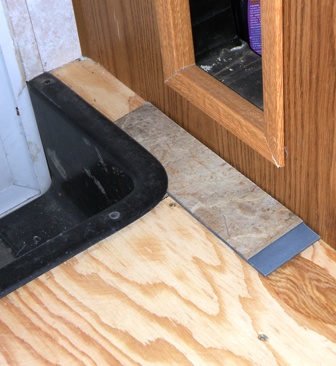
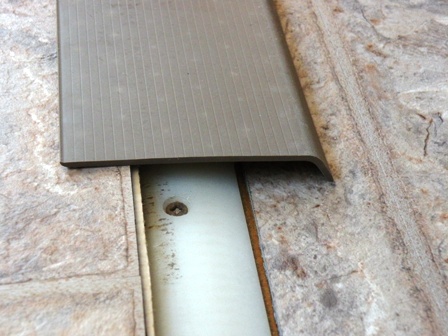
Part of that "Trim out" is inventing a durable transition to cover the Slides "Bearing Bar" when the slide is extended incamp.
I thought I'd had that figured... until having trouble finding the correct material had me wondering for a while...
During a random conversation with a fella at a lumber yard, as I was scheming for a transition solution, for this lil' dilemma holding up my RV flooring replacement , he made the suggestion...
Vinyl Base Moulding!... Perfect!... unitl my "Cheap Gene" kicked in. I found the perfect color at Home Depot... It comes in 4' strips, 20' rolls, and 120' rolls... and I needed 'bout 14'.
On the Vinyl base, the bottom turns out where it would normally meet the floor, when attached to the wall. That's a Bad thing, right?
Nope! I'm use it, upside down! That "Turn out" will turn down... covering the Bearing Bar... and coming close to meeting the slightly lower fixed floor.
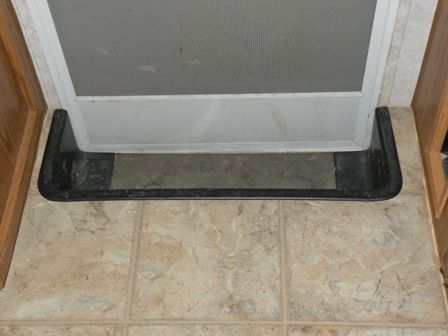
As the slide is retracted or extended... after I finally get this RV Flooring Replacement finished!... if it tilts enough for that transition to hit the fixed floor, that vinyl base will just flex and slide over it without an issue... and without scratching... forcing another RV flooring replacement. Sweet!
The problem, for me, is that the 4' strips are clean... and the 120' rolls are clean... but the 20' variety, that would be a nigh on to the perfect length... is the ONLY one that some fool decided should be coated on the back with a self adhesive. I need to lay it down... upside down for my use... and that eliminated the self adhesive backed variety... and I'm unwilling to waste 106' feet... and it's cost... (my cheap gene)
So... part of this RV Flooring Replacement is working on coming up with a durable way of making a decent seam at all the joints using the 4' strips will require. By the time I perfect it... I may find that the 120' roll was the cheap way out! :-)
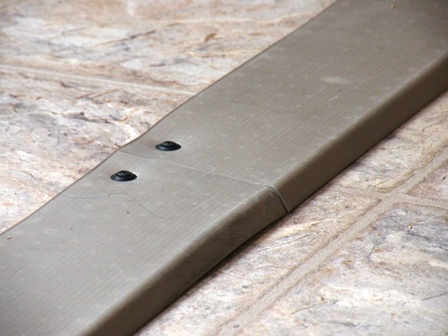
I'm installing it with what I really believe will turn out to be a temporary seaming, using a mix of pvc cement (poly VINYL chloride!) and pretty heavy duty HVAC foil tape on what for me is the back side...
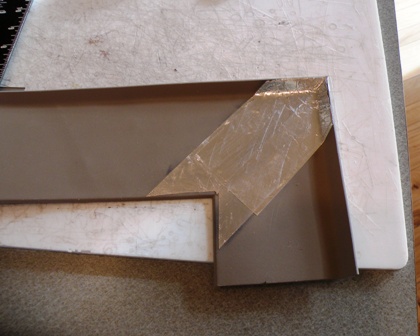
Then... with short screws and finish washers it all gets secured to the edge of the slide floor... Those screws do double duty. First they hold my transition molding in place... and second they'll keep that Allure Floating Vinyl Tile from moving around and sliding off the Slide!
What's up next?... Trimin' out the floor edges with 1/4 rd, and setting the furniture in place... That page will be comin' soon...But for the most part, our RV Flooring Replacement is done!


